Showing posts with label wednesday. Show all posts

6.20.2012

GET STRIPEY

Pin It Now!

it's not quite Friday yet,
and you're draggin
(well, i am, just a smidgen)
so make sure you are making a point to 
put a little umph in your 
step.

-Kel

4.04.2012

CUBE LIFE STYLE/ 05

Pin It Now!

  1. Sweater: Zara
  2. Tank: J. Crew
  3. Pants: Forever 21
  4. Necklace: Anthropologie
  5. Belt: Thrifted


Channeling my former cheerleader self for a high pony.


Wow, that was a doozy of a Wednesday.
Work has been crazy busy, which is why the posts have been on the 
light slash non-existent side.
My apologies...

There has been a lot going on outside of the cube too!
If you Follow or Like me you have probably heard me announce 
that the lovely gals over at 
chose me and ATD to join the Gap Styldby campaign!!!
(toe touch!!!!)
I posted about the 1st round of loveliness here 
It was such a shock and such a sweet offer.
I will post a teensy-weensy-smidgen-bit of the behind the scenes in a bit.
I had a blast meeting the other bloggers that were included in the shoot, which were
who might I add can seriously WERK IT beyond belief. 

To all you that do read or scroll through,
thanks, merci, gracias, grazie, 謝謝, danke!!
I truly appreciate you time, which I know is valuable, 
so to have a morsel of it is golden.

BisousBisous 


2.08.2012

WEDNES-DIY

Pin It Now!
discovered here


Happy Hump Day Y'all!!!!
(yup, the southerner in me just eeked out)

Here is a super cute project you can do to prep for the Easter holiday
that is kind of around the corner.
The year is zooming by a little tooooo fast.
But, why not make it purty along the way.

Bisous**

7.13.2011

W E D N E S D A Y

Pin It Now!


GOSH!!!
how i love finding new ways to lovely-fy a space for almost no moolah.

(you all know i am a penny pincher to the enth degree....)
when i found this photo of a gorgeous cluster of string perched above table, i had to find out how this was created.

the lovelies at Wednesday
have been so kind to share the step by step on how to create your very own.
(How nice are they right??)

So....
lets get to it.....

Gather up:

  • Big balloon
  • Sharpie
  • Scissors
  • Cotton yarn
  • 4 oz. White school glue
  • 1/2 cup of Corn starch
  • 1/4 cup of Warm water
  • Something to stir with
  • Petroleum jelly
  • Clear fast drying spray paint
  • Hanging lamp cord or fishing line (depending on your desired final product)
  • Container for mixing

Directions

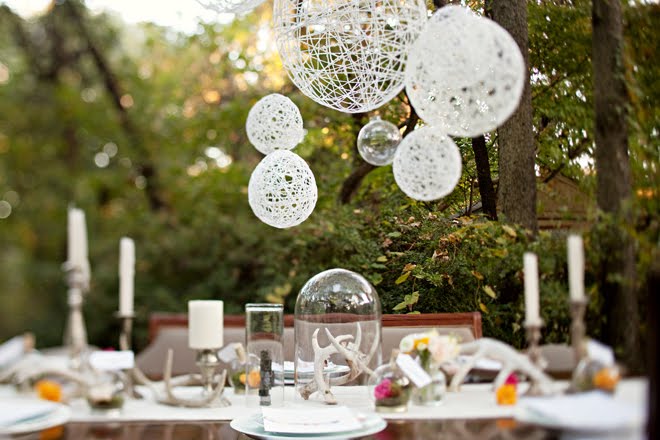
1. Blow up a balloon. We kind of suggest not blowing it up to its maximum capacity so that it is rounder. We've also heard that an exercise ball works great if you want a huge globe!

2. After the balloon is inflated to it's desired size draw a circle with the sharpie around the balloon knot just large enough to accommodate whatever lighting method you choose. Note: If you are just wanting to hang the balls or use them in a vase then you don't need to leave a hole at all!

3. You will need to prepare your work area by laying down a tarp. We hung a shower curtain between two chairs and suspended the balloons by it with string so we could have plenty of working room.

4. Mix corn starch, glue and warm water together until it's not lumpy (too bad getting rid of cellulite isn't this easy).

5. Smear the petroleum jelly all over your balloon until it is completely coated. Note: We specifically left using rubber gloves out of these instructions. You should get messy. If we were concerned about keeping your hands clean this would have been called the "loveliest, merriest and whirliest DIY" not "messiest, merriest and whirliest DIY".

6. Besides sharing in good company, it will go much faster if you have a friend help you with this. One of you begin feeding the yarn through the glue mix and handing it off to the other person to drape around the ball.


7. Tuck the start and end pieces of yarn beneath other pieces of yarn. Begin wrapping the yarn around the balloon vertically at a comfortable tightness, and gradually switch to wrapping horizontally.


8. After your ball has dried for 24 hours, you can pop the balloon! Use a chopstick to knock out any glue crystals that developed between strings.


9. Spray the ball with clear fast drying spray paint outdoors.


I hope you all (myself included) can find a moment while it is still Summer to make the world around you a touch bit lovelier....

Enjoy and Happy DIY-ing!!!!


**Note: Instruction were given verbatim from
Wednesday.
I'm just spreading the lovely...**

7.06.2011

D O O R

Pin It Now!

When one door closes,
look for the open window.

My shoulders feel so much lighter today.....

Happy Hump Day all you lovelies!